來源,這篇只是實作筆記,範例皆來自Webduino官網。
首先Webduino PWM 的腳位是 6、9、10、11,其他腳位並不具有
輸出PWM的功能,PWM是什麼,請參考這一篇
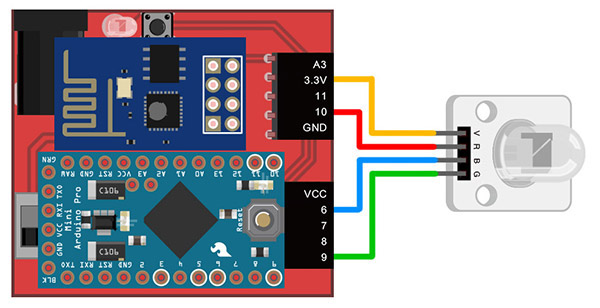
依照官網範例,我們將線路接如下圖
圖片來源:
https://webduino.io/img/tutorials/tutorial-04-02.jpg
三色 LED 的 V 接在 3.3v 的腳位,
紅色 R 接在 6,
藍色 B 接在 9,
綠色 G 接在 10。
實際接線圖
白色是3.3V
藍色是B
綠色是G
紅色是R

接下來
1.建立一個HTML檔案
2.引入相關的 js 與 WebComponents (<head>放在這裡 </head>)實際接線圖
白色是3.3V
藍色是B
綠色是G
紅色是R

接下來
1.建立一個HTML檔案
 <!DOCTYPE html>
 <html>
   <head>
     <title>RGB LED</title>
     <meta charset="UTF-8">
     <meta name="viewport" content="width=device-width, initial-scale=1.0">
   </head>
   <body>
     <div>TODO write content</div>
   </body>
 </html>
 <script src="https://webduino.io/components/webcomponentsjs/webcomponents.js"></script>
 <link rel='import' href='https://webduino.io/components/webduino/web-arduino.html' />
 <link rel='import' href='https://webduino.io/components/webduino/wa-rgbled.html'/>
3.製作3個拉霸(用於調整3個顏色)並放置一個顯示目前顏色用的區塊(<body>放在這裡 </body>)
 <div>
  <label>red:</label>
  <input id='redBtn' type='range' min='0' max='255' step='5' value='0'>
 </div>
 <div>
  <label>green: </label>
  <input id='greenBtn' type='range' min='0' max='255' step='5' value='0'>
 </div>
 <div>
  <label>blue: </label>
  <input id='blueBtn' type='range' min='0' max='255' step='5' value='0'>
 </div>
 <div id="show"></div>
 <web-arduino id='board' device="你的 device 名稱">
  <wa-rgbled id='rgb' red='6' blue='9' green='10'></wa-rgbled>
 </web-arduino>
4.用CSS定義一下區塊 (<head>放在這裡 </head>)
  <style>
           #show{
      width: 100%;
      max-width: 250px;
      height:100px;
      border:1px solid #000;
      background:#000;
      margin-top: 15px;
      margin-left: 5px;
      }
     </style>
5.加入javaScript來作控制(<body>放在</web-arduino>的內容後面 </body>)
  <script lang="javascript">
   window.addEventListener('WebComponentsReady', function () {
    var board = document.getElementById('board');
    board.on('ready',function() {
     var redBtn = document.getElementById('redBtn'),
      greenBtn = document.getElementById('greenBtn'),
      blueBtn = document.getElementById('blueBtn'),
      rgb = document.getElementById('rgb'),
      show = document.getElementById('show'),
      r = 0,
      g = 0,
      b = 0;
     var handler = function(evt) {
      var target = evt.target,
       id = target.id;
      switch (id) {
       case 'redBtn':
        r = target.value;
        break;
       case 'greenBtn':
        g = target.value;
        break;
       case 'blueBtn':
        b = target.value;
        break;
      }
      show.style.backgroundColor = 'rgba(' + r + ',' + g + ',' + b + ',' + '255)';
      rgb.setColor(r, g, b);
     };
     redBtn.addEventListener('change', handler, false);
     greenBtn.addEventListener('change', handler, false);
     blueBtn.addEventListener('change', handler, false);
    });
   }, false);
   </script>
執行結果


完成網頁程式碼
 <!DOCTYPE html>
 <html>
   <head>
     <title>RGB LED</title>
     <meta charset="UTF-8">
     <meta name="viewport" content="width=device-width, initial-scale=1.0">
     <script src="https://webduino.io/components/webcomponentsjs/webcomponents.js"></script>
     <link rel='import' href='https://webduino.io/components/webduino/web-arduino.html' />
     <link rel='import' href='https://webduino.io/components/webduino/wa-rgbled.html'/>
     <style>
           #show{
      width: 100%;
      max-width: 250px;
      height:100px;
      border:1px solid #000;
      background:#000;
      margin-top: 15px;
      margin-left: 5px;
      }
     </style>
   </head>
   <body>
   <div>
   <label>red:</label>
   <input id='redBtn' type='range' min='0' max='255' step='5' value='0'>
   </div>
   <div>
    <label>green: </label>
    <input id='greenBtn' type='range' min='0' max='255' step='5' value='0'>
   </div>
   <div>
    <label>blue: </label>
    <input id='blueBtn' type='range' min='0' max='255' step='5' value='0'>
   </div>
   <div id="show"></div>
   <web-arduino id='board' device="your device id">
    <wa-rgbled id='rgb' red='6' blue='9' green='10'></wa-rgbled>
   </web-arduino>
   <script lang="javascript">
   window.addEventListener('WebComponentsReady', function () {
    var board = document.getElementById('board');
    board.on('ready',function() {
     var redBtn = document.getElementById('redBtn'),
      greenBtn = document.getElementById('greenBtn'),
      blueBtn = document.getElementById('blueBtn'),
      rgb = document.getElementById('rgb'),
      show = document.getElementById('show'),
      r = 0,
      g = 0,
      b = 0;
     var handler = function(evt) {
      var target = evt.target,
       id = target.id;
      switch (id) {
       case 'redBtn':
        r = target.value;
        break;
       case 'greenBtn':
        g = target.value;
        break;
       case 'blueBtn':
        b = target.value;
        break;
      }
      show.style.backgroundColor = 'rgba(' + r + ',' + g + ',' + b + ',' + '255)';
      rgb.setColor(r, g, b);
     };
     redBtn.addEventListener('change', handler, false);
     greenBtn.addEventListener('change', handler, false);
     blueBtn.addEventListener('change', handler, false);
    });
   }, false);
   </script>
   </body>
 </html>
參考資料:
https://webduino.io/tutorials/tutorial-04-rgbled-palette.html
沒有留言:
張貼留言