PIN9接LED正極,GND接LED負極(負極請串上一個200歐姆限流電阻)
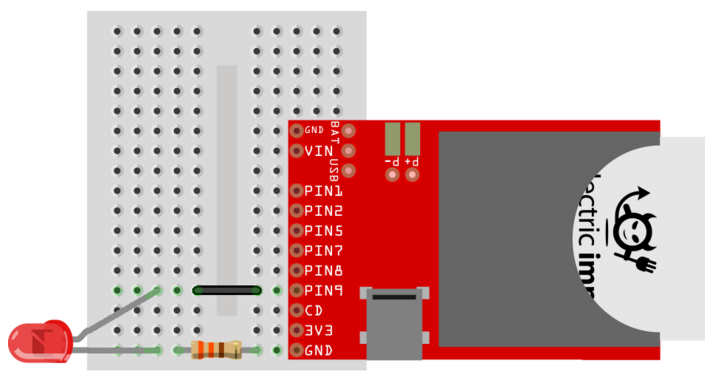
(圖是從網路上轉貼的,https://electricimp.com/docs/examples/digitalout-led/)
Device 程式碼
 Assign pin9 to a global variable
led <- hardware.pin9;
// Configure LED pin for DIGITAL_OUTPUT, and set initial state to off
led.configure(DIGITAL_OUT, 0);
// Assign a global variable to track current state of LED pin
// Function to blink LED
function setLED(value) {
    server.log(value);
    // Set LED pin to new value
    led.write(value.tointeger());
}

// When we get a 'led' message from the agent, call returnFromImp()
agent.on("led", setLED);
Agent 程式碼
//Define an HTTP request handler
function requestHandler(request, response) {
 try {
  if ("led" in request.query) {
 // 'setting' is a URL-encoded parameter, ie. '/led=1'
  local settingValue = request.query.led;
//sent data to device
setLED(settingValue);
 // Use the 'response' object to acknowledge reception of the request
  // to the request's source. '200' is HTTP status code for 'OK'
response.send(200, "Setting received and applied");
}

else
 {
 response.send(200, "no setting");
 }
} catch (error) {
  // Something went wrong; inform the source of the request
 // '500' is HTTP status code for 'Internal Server Error'
 response.send(500, error);
}
}
function setLED(value) {
 // Send the device a 'led' message immediately
device.send("led", value);
server.log(value);}
// Register the handler function as a callback
http.onrequest(requestHandler);
程式碼基本上是Agent接收到Http傳送過來的 led 參數,然候傳送給device做LED亮滅。
你會發現2份程式碼中,紅色粗體的地方就是Agent 傳送以及Device接收都被很好的包裝
成函數,開發者不必花很多心力處理Agent與Device之間溝通。
接下來,我們只在在瀏覽器輸入(請將網址中的myTag換成您的device 代碼)
https://agent.electricimp.com/myTag?led=0
或
https://agent.electricimp.com/myTag?led=1
即可控制LED亮滅。
實際運作情況可以參考下列影片
這樣即使人在外面,可以透過PC 或是用手機輸入網址來控制家中的設備
亦可透過APP發出HTTP Request來操作。
沒有留言:
張貼留言